Tuesday, November 21, 2017

Lattice Edged Cards

Hello again. Long time no share : )         
As discussed in the previous post, I will do up a quick share with the lattice cards I made with the template from this lovely lady's blog. Zoo sent it to me and of course, I had to try. Who knew how easy this would be and how much fun detail it adds to cards. Definitely should be on your to-do list.

I fell in love with the Chicks stamps set from StampinUp's Salebration earlier this year. They are the most adorable little things and I could just do a million cards with them (admittedly, I did do a ton of them at first. Only two with the lattice, though). The bows were from a video Zoo sent out and I love them to death. Origami folded so are nice and flat and cheap to mail. The What's Up stamp is a $1.50 one from Micheal's and the Happy Big Day stamp is from StampinUp and Zoo sent the stamped tag to me.


These adorable giraffe's were stamped at Zoo place and brought home to play with. The first one I placed overlapping a piece of paintable wallpaper left over from a reno job. I used my watercolour wax crayons to add colour and I love this card. Simple but sweet.


This floral stamp, Zoo stamped 5-6 years ago on her scrap crap paper and mailed to me. I used my water colour pencil crayons to add colour and then highlighted with gel pens. The metal hole ribbon behind was from the dollarama years ago. It is awkward to glue on (I used my two way glue on the parts seen and double sided tape under the flower) but is an awesome addition to the card.

Since falling in love with lattice edged cards I went out and found some super cheap, on clearance templates to do more. Doing the template along the edge of the paper is the easiest, as scissors can be used. Doing the template on the interior of the card is harder on the hand, as a sharp papertole knife needs to be used. Either makes a beautiful image but so far I have only made cards with the small circle ones. I will add picture of future cards when I have time to make them. For now the only two I have done are shown on the last post I did earlier today, using the Time Warp stencil.


Well, again... have a great day. I need to move and get away from the laptop. 

Cheers, Red Bear : )


Time stencils and bigz die

This morning I will be writing about the fun I had experimenting with my new stencils and Zoo's Tim Holtz Bigz Pocket watch die. Fairly recently, I purchased two new stencils by Andy Skinner, Time Warp and Old Film. 

I had a few minutes one day to play with them and so I first used a sponge brush to apply blue acrylic paint on the Old Film stencil (I couldn't find my new sponge stencil applicators at the time) and the paint bled through quite a bit. Not wanting to throw away the end product I did use half the page to make a couple cards and used the very destroyed half as the inside of the cards to write on (I flipped them upside down to show the white side, thus not wasting paper. Zoo will be rolling her eyes at me at this point.) 

On the Time Warp stencil I used the one and only Tim Holtz Distress Paint Dobber I own that is a Frayed Burlap colour. It was much better at not bleeding threw and I made three cards with that sheet.


I used the concept of Time will help heal wounds on this card and used Zoo's Tim Holtz Alterations Movers & Shapers Pocket Watch Frame Bigz Die (658571) for the focal point. The pocket watch image is one cut from an old magazine and the brown background I free hand cut for the watch. The stamp set I used for this card was from StampinUp, Designer Tee set.


The following two cards done with the Time Warp stencil I used the American Traditional Designs Cut and Fold Template to make a lattice type border along the top edge. I bought these templates after falling in love with lattice borders using a free template downloaded from this fun blog  http://www.barbstamps.com/my_weblog/2017/02/video-lattice-fold.html. I will be doing a post about the cards I did with her template next.
In any case. The stamp I used is a sweet spiral one from the StampinUp Garden Whimsy set. The circles were cut with Sizzix's Circles #2 Bigz die. The adorable arrow eyelet I don't have a brand for but I purchased them at Micheal's years ago. They fit in nice with the time theme.


The blue cards using the Old Film stencil turned out cute. I used; washi tape from Dollarama that  has been on my to do list forever; Tim Holtz Alterations Washer Border die; SpellBinders Nestabilities Fleur de Lis Squares die set; the Sizziz Circles #2 Bigz die; StampinUp Designer Tee stamp set; and a scalloped circle that Zoo sent me a year or two ago.


Surprising what you can do with a couple of 8 1/2'x11' pieces of paper it took you all of two minutes to flop paint through a couple of stencils onto. Imagine what could be done with more time and practice.

Take care and have fun! Red Bear : )

Tuesday, November 14, 2017

Corner Heart Punch

Good morning. I have had a little post it note with some information to make a post on the counter for a couple of weeks now and have finally sat down to do it. Funny how life gets in the way of the to-do list.
In any case... I had filled a little box of corner heart punches at Zoo's place before moving East, years ago. I have never used them and as the theme of this year is to use things I have had forever, it was high time to delve in. All the punches were on scrap pieces of paper of varying sizes and colours.

I first used the larger pieces that had a punch in each of the four corners. I used mainly Dollarama 6"x6" paper pads that I have had for years and not used. The two pads I used were the Rainbow Scrapbook and the Flower Scrapbook pads. I hope Zoo will add the name of the company who made the punch. I like how the hearts are not quite cut out and so I could add another layer of paper under the top of each heart to add dimension. The cards are bright and yet not too overpowering. I tend to not use patterned paper but this was a good use of the bolder patterns I had been avoiding. 


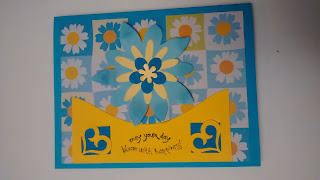
Having used up the larger pieces it was time to move onto the more narrow bits that only had two heart punched per piece. I used Zoo's Spellbinder's Curved Border's dies to make one edge more decorative. I was originally going to have a piece of the card slide in and out of the heart punch paper but then decided to just use a big flower instead. I added a coordinating colour under each corner punch to add interest and a small stamp in between. The big flowers are from using a friends dies and Big Shot years ago. I believe the biggest flower is from StampinUp and the smaller ones are from my McGill Petite Petals Punch and my Martha Stewart's Floral Anywhere Punch. A good use of paper I would not normally use


I have more punched corners remaining but ran out of time. I will get to them in the years to come.   Happy November!

Red Bear : )